Create Beautiful User Interfaces with Flutter
Full Source Code
The full source code for the following post is available here in the GitHub Repo
Video
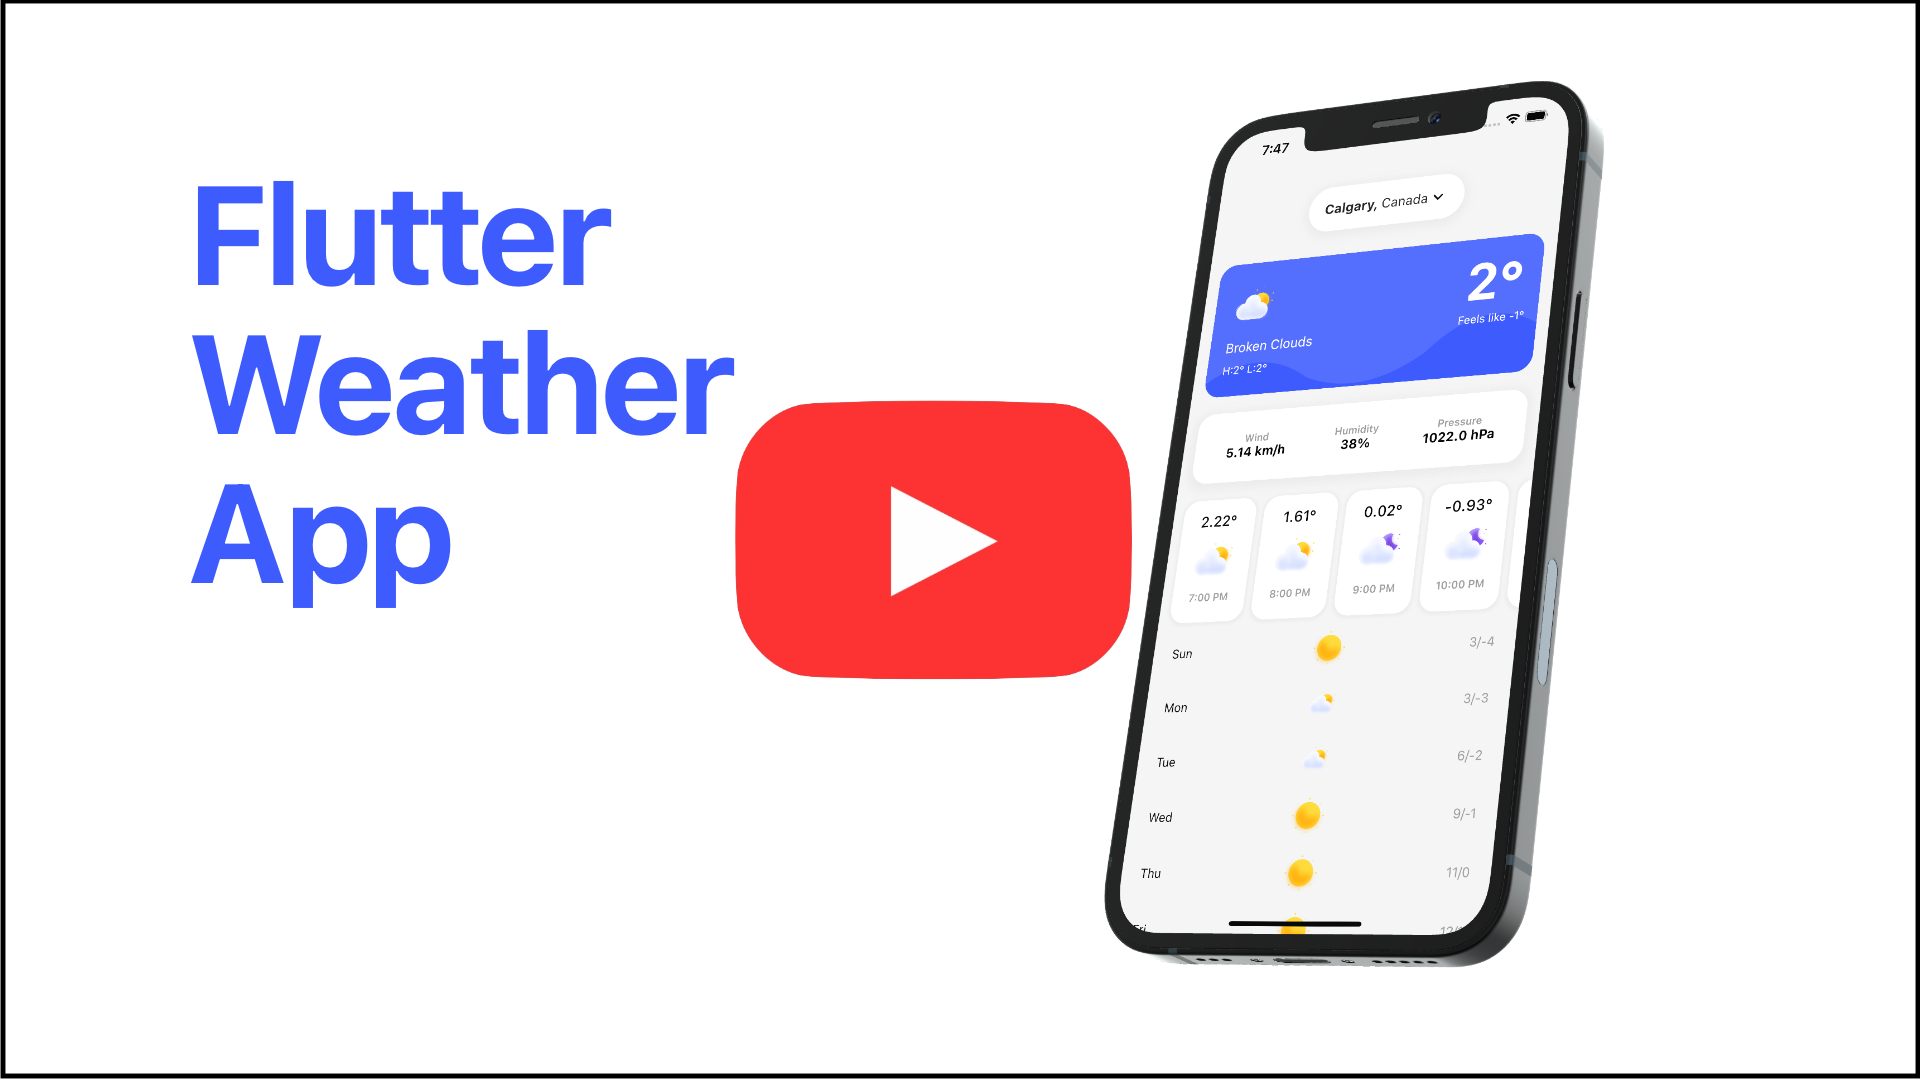
In my last blog post, I demonstrated how to build a basic app with Flutter. This app would query weather data from the OpenWeather API and display it on screen. This next blog post takes that app as a starting point and builds a beautiful user interface into it. Let’s get started!
Getting Started
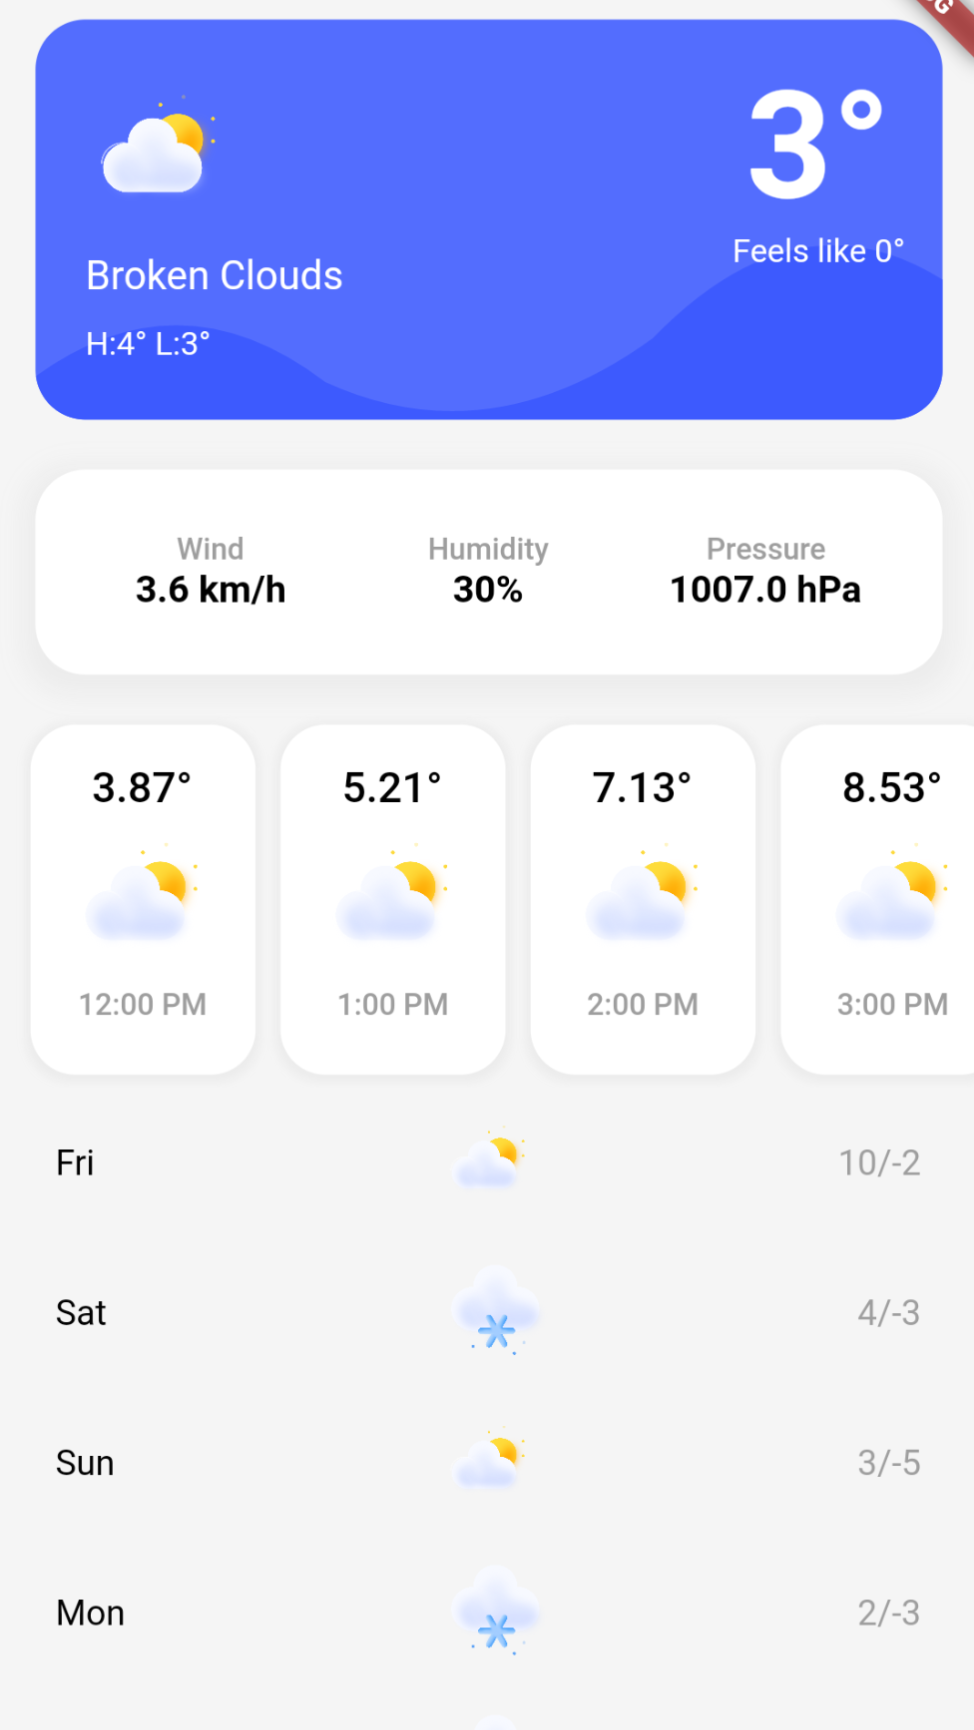
First things first. Looking at the above image of what we will be creating, you will notice that we now pull additional data from OpenWeather. Along with the current weather, we also grab the hourly forecast as well as the daily forecast.
Let’s work on adding that functionality to our app.
First, we will need to create the following models.
- Daily
- Hourly
- Forecast
This is what they should all contain.
daily.dart
class Daily {
  final int dt;
  final double temp;
  final double feelsLike;
  final double low;
  final double high;
  final String description;
  final double pressure;
  final double humidity;
  final double wind;
  final String icon;

  Daily({this.dt, this.temp, this.feelsLike, this.low, this.high, this.description, this.pressure, this.humidity, this.wind, this.icon});

  factory Daily.fromJson(Map<String, dynamic> json) {
    return Daily(
      dt: json['dt'].toInt(),
      temp: json['temp']['day'].toDouble(),
      feelsLike: json['feels_like']['day'].toDouble(),
      low: json['temp']['min'].toDouble(),
      high: json['temp']['max'].toDouble(),
      description: json['weather'][0]['description'],
      pressure: json['pressure'].toDouble(),
      humidity: json['humidity'].toDouble(),
      wind: json['wind_speed'].toDouble(),
      icon: json['weather'][0]['icon'],
    );
  }
}
hourly.dart
class Hourly {
  final int dt;
  final double temp;
  final double feelsLike;
  final double pressure;
  final double dewPoint;
  final double uvi;
  final double visibility;
  final double wind;
  final String description;
  final String icon;

  Hourly({this.dt, this.temp, this.feelsLike, this.pressure, this.dewPoint, this.uvi, this.visibility, this.wind, this.description, this.icon});

  factory Hourly.fromJson(Map<String, dynamic> json) {

    return Hourly(
      dt: json['dt'].toInt(),
      temp: json['temp'].toDouble(),
      feelsLike: json['feels_like'].toDouble(),
      pressure: json['pressure'].toDouble(),
      dewPoint: json['dew_point'].toDouble(),
      uvi: json['uvi'].toDouble(),
      visibility: json['visibility'].toDouble(),
      wind: json['wind_speed'].toDouble(),
      description: json['weather'][0]['description'],
      icon: json['weather'][0]['icon'],
    );
  }
}
forecast.dart
import 'package:weather/models/daily.dart';
import 'package:weather/models/hourly.dart';

class Forecast {
  final List<Hourly> hourly;
  final List<Daily> daily;

  Forecast({this.hourly, this.daily});

  factory Forecast.fromJson(Map<String, dynamic> json) {
    List<dynamic> hourlyData = json['hourly'];
    List<dynamic> dailyData = json['daily'];

    List<Hourly> hourly = new List<Hourly>();
    List<Daily> daily = new List<Daily>();

    hourlyData.forEach((item) {
      var hour = Hourly.fromJson(item);
      hourly.add(hour);
    });

    dailyData.forEach((item) {
      var day = Daily.fromJson(item);
      daily.add(day);
    });

    return Forecast(
      hourly: hourly,
      daily: daily
    );
  }
}
We are also going to update our weather.dart model to the following
weather.dart
class Weather {
  final double temp;
  final double feelsLike;
  final double low;
  final double high;
  final String description;
  final double pressure;
  final double humidity;
  final double wind;
  final String icon;

  Weather({this.temp, this.feelsLike, this.low, this.high, this.description, this.pressure, this.humidity, this.wind, this.icon});

  factory Weather.fromJson(Map<String, dynamic> json) {
    print(json);
    return Weather(
      temp: json['main']['temp'].toDouble(),
      feelsLike: json['main']['feels_like'].toDouble(),
      low: json['main']['temp_min'].toDouble(),
      high: json['main']['temp_max'].toDouble(),
      description: json['weather'][0]['description'],
      pressure: json['main']['pressure'].toDouble(),
      humidity: json['main']['humidity'].toDouble(),
      wind: json['wind']['speed'].toDouble(),
      icon: json['weather'][0]['icon'],
    );
  }
}
Adding an extension
We will need a couple of small extensions to the String class to help format text. To do this we will create a new file called extensions.dart in the root of the project. Here is the code to insert into that file.
extensions.dart
extension StringExtension on String {
    String get inCaps => '${this[0].toUpperCase()}${this.substring(1)}';
    String get allInCaps => this.toUpperCase();
    String get capitalizeFirstOfEach => this.split(" ").map((str) => str.inCaps).join(" ");
}
This will allow us to take text like this: “partly cloudy” and turn it into this: “Partly Cloudy”. Much nicer!
Adding another dependency
Later on, we will need to convert a timestamp to a different date format. To do this we will need to add the intl: ^0.16.1 dependency to the pubspec.yaml file. For detailed instructions on how to do this check out the previous blog post.
Updating main.dart
We have a couple of small updates to main.dart. This update allows for you to input your own location to be used to fetch weather data as well as a set up for you to eventually add on multiple locations. This blog post doesn’t go that far but we are going to lay the groundwork for that to happen.
main.dart
class MyApp extends StatelessWidget {
  List<Location> locations = [
    new Location(city: "calgary", country: "canada", lat: "51.0407154", lon: "-114.1513999")
  ];

  @override
  Widget build(BuildContext context) {
    return MaterialApp(
      title: 'Weather App',
      theme: ThemeData(
        primarySwatch: Colors.blue,
        visualDensity: VisualDensity.adaptivePlatformDensity,
      ),
      home: CurrentWeatherPage(locations, context),
    );
  }
}
This is what your MyApp class should look like. We have added the locations variable, populated it with a location and passed it to our CurrentWeatherPage widget.
Setting up the main view
We will be replacing the CurrentWeatherPage() class and the _CurrentWeatherPageState() with the following code.
currentWeather.dart
class CurrentWeatherPage extends StatefulWidget {
  final List<Location> locations;
  final BuildContext context;
  const CurrentWeatherPage(this.locations, this.context);

  @override
  _CurrentWeatherPageState createState() =>
      _CurrentWeatherPageState(this.locations, this.context);
}

class _CurrentWeatherPageState extends State<CurrentWeatherPage> {
  final List<Location> locations;
  final Location location;
  final BuildContext context;
  _CurrentWeatherPageState(List<Location> locations, BuildContext context)
      : this.locations = locations,
        this.context = context,
        this.location = locations[0];

  @override
  Widget build(BuildContext context) {
    return Scaffold(
      backgroundColor: Colors.grey[100],
      body:
        ListView(
          children: <Widget>[
            currentWeatherViews(this.locations, this.location, this.context),
            forcastViewsHourly(this.location),
            forcastViewsDaily(this.location),
          ]
        )
    );
  }
}
We will be going over all the details of this code snippet later on throughout the rest of the blog post. For now, just make note of the three methods being called inside of the ListView.
Fetching the Weather Data
Inside currentWeather.dart there is the method getCurrentWeather() we are going to insert the following method directly below.
currentWeather.dart
Future getForecast(Location location) async {
  Forecast forecast;
  String apiKey = "YOUR API KEY";
  String lat = location.lat;
  String lon = location.lon;
  var url =
      "https://api.openweathermap.org/data/2.5/onecall?lat=$lat&lon=$lon&appid=$apiKey&units=metric";

  final response = await http.get(url);

  if (response.statusCode == 200) {
    forecast = Forecast.fromJson(jsonDecode(response.body));
  }

  return forecast;
}
Don’t forget the insert your API Key!
This method should look very familiar, it is almost exactly the same as the one we built in the last blog post so I’m not going to spend any more time going over it as the details can all be found there.
Using Future Builder to Asynchronously load data
We will need to add three more methods, each uses the FutureBuilder that we referenced in the first blog post. The first method is to load the current weather data, the second is to load the hourly forecast and the third is for the daily forecast.
currentWeather.dart
Widget currentWeatherViews(
    List<Location> locations, Location location, BuildContext context) {
  Weather _weather;

  return FutureBuilder(
    builder: (context, snapshot) {
      if (snapshot.hasData) {
        _weather = snapshot.data;
        if (_weather == null) {
          return Text("Error getting weather");
        } else {
          return Column(children: [
            createAppBar(locations, location, context),
            weatherBox(_weather),
            weatherDetailsBox(_weather),
          ]);
        }
      } else {
        return Center(child: CircularProgressIndicator());
      }
    },
    future: getCurrentWeather(location),
  );
}

Widget forcastViewsHourly(Location location) {
  Forecast _forcast;

  return FutureBuilder(
    builder: (context, snapshot) {
      if (snapshot.hasData) {
        _forcast = snapshot.data;
        if (_forcast == null) {
          return Text("Error getting weather");
        } else {
          return hourlyBoxes(_forcast);
        }
      } else {
        return Center(child: CircularProgressIndicator());
      }
    },
    future: getForecast(location),
  );
}

Widget forcastViewsDaily(Location location) {
  Forecast _forcast;

  return FutureBuilder(
    builder: (context, snapshot) {
      if (snapshot.hasData) {
        _forcast = snapshot.data;
        if (_forcast == null) {
          return Text("Error getting weather");
        } else {
          return dailyBoxes(_forcast);
        }
      } else {
        return Center(child: CircularProgressIndicator());
      }
    },
    future: getForecast(location),
  );
}
These methods should all seem very familiar if you have read through the first blog post. Therefore I won’t spend too much time on them.
Build the current weather card
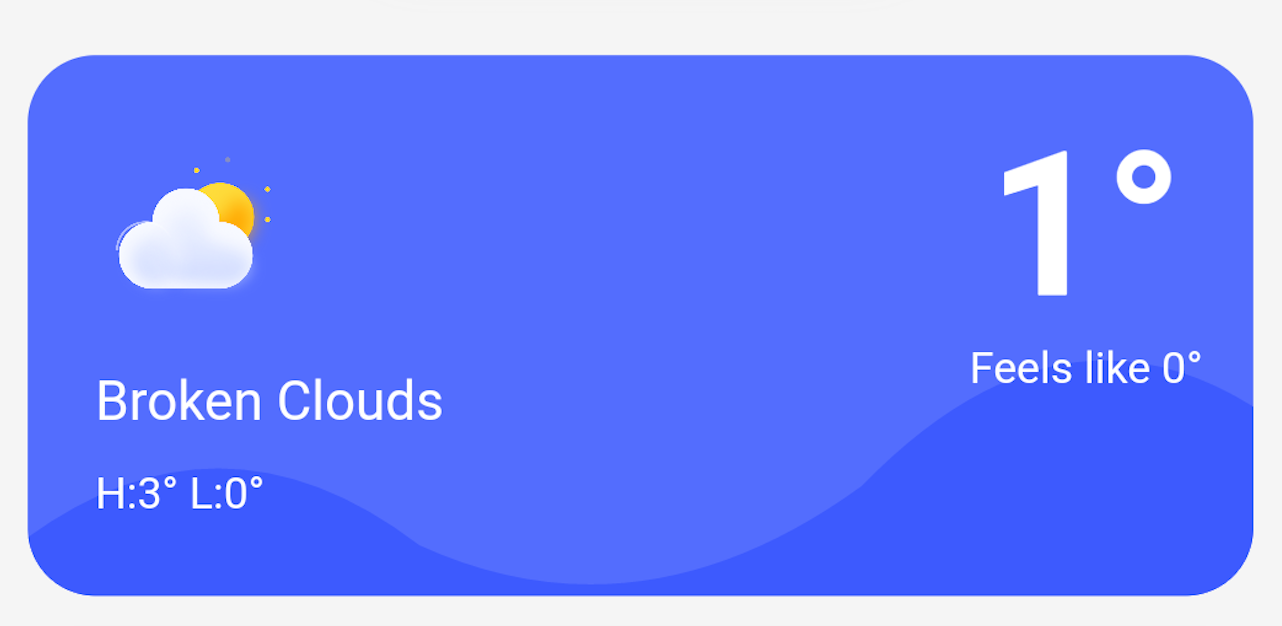
The first card of information we are going to build is the big blue one at the very top. Looking at it we have 6 data points.
- Current temperature
- High temperature
- Low temperature
- Feels like temperature
- Description
- Icon
From this, you can see that we have 5 Text widgets and 1 Image widget. Looking at the background there is one solid blue color with a wavey line over top. This waving line was drawn with a widget called ClipPath. We will look into that a little later.
To try to understand how to build and position this widget a little bit better I came up with this diagram.
-
Red box = container
- Add padding and margin to the widgets within
-
Green box = column
- Stacks widgets vertically
-
Purple box = row
- Stacks widgets horizontally
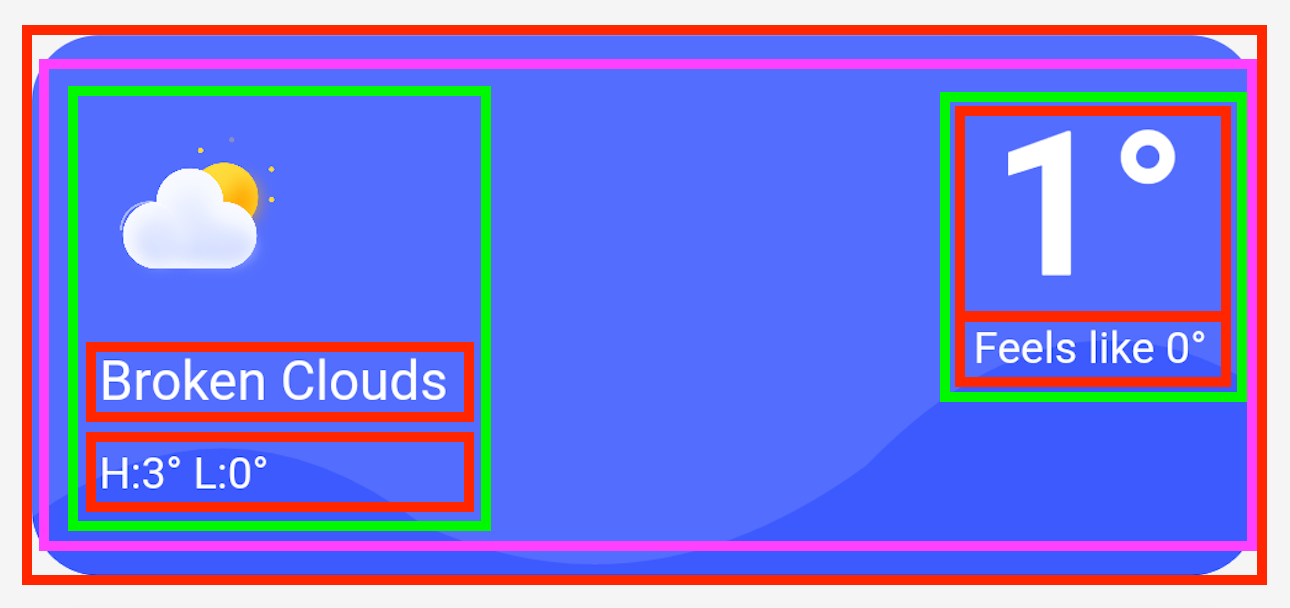
With this in mind, it should make a little bit more sense how to create this widget and position each of those widgets in the correct spot.
Create the method
Let’s create a method to build this card. The method definition should look like this: Widget weatherBox(Weather _weather). It will be called weatherBox, it will return a widget and take a Weather instance as input.
Now, lets add that first outer container.
currentWeather.dart
...
Container(
        padding: const EdgeInsets.all(15.0),
        margin: const EdgeInsets.all(15.0),
        height: 160.0,
        decoration: BoxDecoration(
            borderRadius: BorderRadius.all(Radius.circular(20))),
        child: ...
)
...
I’ve added some padding, margin, height and decoration properties to the container which should be pretty self-explanatory.
Now, let’s add a Row as the child of this container.
currentWeather.dart
...
child: Row(
          children: [
              ...
          ]
)
...
Starting with the left side of the Row let’s add that Column. We are also going to wrap this Column in the Expanded widget to have it expand and take up as much space as possible within its parent.
currentWeather.dart
...
children: [
    Expanded(
        child: Column(
            crossAxisAlignment: CrossAxisAlignment.start,
            mainAxisSize: MainAxisSize.min,
            children: <Widget>[
                ...
            ]
        )
    )
    ...
]
...
The crossAxisAlignment and mainAxisSize properties will ensure the content is left aligned and will minimize the amount of free space along the main axis.
The first thing inside this column is the weather icon, we will come back to this later. The next widget is the description text and the High and Low text. Let’s add those widgets!
currentWeather.dart
...
children: <Widget>[
    // Insert icon here!
    Container(
        margin: const EdgeInsets.all(5.0),
        child: Text(
        "${_weather.description.capitalizeFirstOfEach}",
        style: TextStyle(
            fontWeight: FontWeight.normal,
            fontSize: 16,
            color: Colors.white),
        )),
    Container(
        margin: const EdgeInsets.all(5.0),
        child: Text(
        "H:${_weather.high.toInt()}° L:${_weather.low.toInt()}°",
        textAlign: TextAlign.left,
        style: TextStyle(
            fontWeight: FontWeight.normal,
            fontSize: 13,
            color: Colors.white),
        )),
]
...
We will almost always wrap our text widgets inside containers to help position them. Here we add some margin to the containers. We also add some text styles to each text widget.
Moving on to the right side of the Row we will have another Column.
currentWeather.dart
...
children: [
...
    Column(children: <Widget>[
        Container(
        child: Text(
            "${_weather.temp.toInt()}°",
            textAlign: TextAlign.left,
            style: TextStyle(
                fontWeight: FontWeight.bold,
                fontSize: 60,
                color: Colors.white),
        )
        ),
        Container(
            margin: const EdgeInsets.all(0),
            child: Text(
            "Feels like ${_weather.feelsLike.toInt()}°",
            textAlign: TextAlign.left,
            style: TextStyle(
                fontWeight: FontWeight.normal,
                fontSize: 13,
                color: Colors.white),
            )),
    ])
...
]
You will notice that we once again have 2 containers with a text widget each. Now, let’s look into getting this icon!
Weather icons
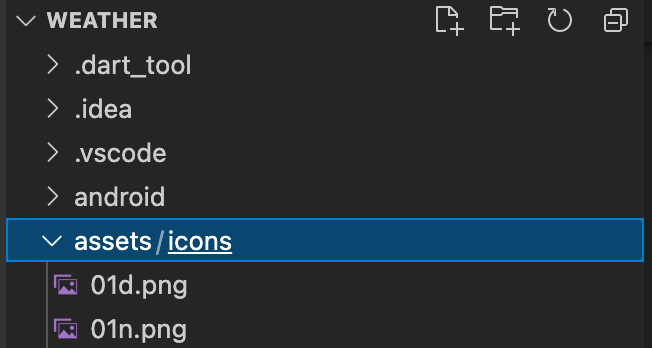
There are 16 different weather icon names that OpenWeather can specify. Inside the GitHub repository, I have uploaded all 16 icons we will be using. You can add them into your project inside a folder with the following path: assets/icons/.
Add the info to pubspec.yaml
Ensure that you add the following line inside pubspec.yaml under the flutter: line.
pubspec.yaml
flutter:
...
  assets:
    - assets/icons/
Ensure that you pay attention to the white space! YAML is sensitive to white space.
Methods to get icons
Back in currentWeather.dart lets add the following 2 methods.
currentWeather.dart
Image getWeatherIcon(String _icon) {
  String path = 'assets/icons/';
  String imageExtension = ".png";
  return Image.asset(
    path + _icon + imageExtension,
    width: 70,
    height: 70,
  );
}

Image getWeatherIconSmall(String _icon) {
  String path = 'assets/icons/';
  String imageExtension = ".png";
  return Image.asset(
    path + _icon + imageExtension,
    width: 40,
    height: 40,
  );
}
These methods will return an Image widget with the specified icon.
Going back into the weatherBox method we can add the first method inside our column.
currentWeather.dart
...
children: <Widget>[
    getWeatherIcon(_weather.icon),
    Container(
        margin: const EdgeInsets.all(5.0),
        child: Text(
        "${_weather.description.capitalizeFirstOfEach}",
        style: TextStyle(
            fontWeight: FontWeight.normal,
            fontSize: 16,
            color: Colors.white),
        )),
    Container(
        margin: const EdgeInsets.all(5.0),
        child: Text(
        "H:${_weather.high.toInt()}° L:${_weather.low.toInt()}°",
        textAlign: TextAlign.left,
        style: TextStyle(
            fontWeight: FontWeight.normal,
            fontSize: 13,
            color: Colors.white),
        )),
]
...
ClipPath
We are almost done with this first box in our weather app. Now for the hardest part, ClipPath! ClipPath allows you to draw shapes and lines. We can specify these shapes and lines with different methods such as:
For Shapes
- addRect()
- Adds a rectangle
- addOval()
- Adds an oval
- addArc()
- Adds an arc
There are many more methods to draw shapes but these are some common ones
To draw lines
- quadraticBezierTo
- Will draw a line based a 3 given points. This is what we will be using.
- cubicTo
- Similar to quadraticBezierTo except it uses 4 points
There are also several more methods to draw shapes but these are again some of the common ones
quadraticBezierTo
Let’s look deeper into quadraticBezierTo.
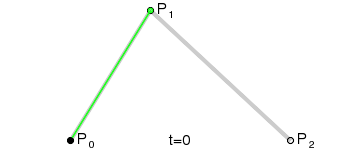
Source: Wikipedia
Here is a visual demonstration of quadraticBezierTo in action. You can see that there is a line between P0 and P1. These points move at the same rate to P1 and P2 along with a point that progresses along that line at the same rate which will then draw a curve. Take a little while to familiarize yourself with the above visual before moving on to some code.
Coding this clip path
We can add the following class definition to the bottom of our currentWeather.dart file
currentWeather.dart
...
class Clipper extends CustomClipper<Path> {
  @override
  Path getClip(Size size) {
    Path path = Path();
    path.moveTo(0, size.height - 20);

    path.quadraticBezierTo((size.width / 6) * 1, (size.height / 2) + 15, (size.width / 3) * 1, size.height - 30);

    path.quadraticBezierTo((size.width / 2) * 1, (size.height + 0), (size.width / 3) * 2, (size.height / 4) * 3);

    path.quadraticBezierTo((size.width / 6) * 5, (size.height / 2) - 20, size.width, size.height - 60);

    path.lineTo(size.width, size.height - 60);
    path.lineTo(size.width, size.height);
    path.lineTo(0, size.height);

    path.close();

    return path;
  }

  @override
  bool shouldReclip(Clipper oldClipper) => false;
}
...
Looking at this code we call the quadraticBezierTo three times to draw three curves, two convex and one concave.
The Path() instance will draw a line based on a given point that you can move around. We set the point to start at (0, size.height - 20). This is the far left side and 20 pixels from the bottom.
Then we draw our three curves moving towards the right side of the screen. Then we draw down to the bottom with path.lineTo(size.width, size.height); and then back to the right with path.lineTo(0, size.height);.

In the end, it should look something like this
Add the clip path to the weatherBox
There are a few more things we need to change in the weatherBox to make it work. First of all, we will need to use the Stack widget. This widget allows us to stack widgets on a Z index. So we can place our text widgets on top of our ClipPath.
Secondly, we need to give our ClipPath something to clip. i.e. a Container widget.
Thirdly we need to put it all together to create on HUGE widget tree! Ideally, you would want to break this up into a bunch of different smaller widgets or methods but this blog post is about widget design and not proper code structure. Anyways, here is the full method
currentWeather.dart
...
Widget weatherBox(Weather _weather) {
  return Stack(children: [
    Container(
      padding: const EdgeInsets.all(15.0),
      margin: const EdgeInsets.all(15.0),
      height: 160.0,
      decoration: BoxDecoration(
          color: Colors.indigoAccent,
          borderRadius: BorderRadius.all(Radius.circular(20))),
    ),
    ClipPath(
        clipper: Clipper(),
        child: Container(
            padding: const EdgeInsets.all(15.0),
            margin: const EdgeInsets.all(15.0),
            height: 160.0,
            decoration: BoxDecoration(
                color: Colors.indigoAccent[400],
                borderRadius: BorderRadius.all(Radius.circular(20))))),
    Container(
        padding: const EdgeInsets.all(15.0),
        margin: const EdgeInsets.all(15.0),
        height: 160.0,
        decoration: BoxDecoration(
            borderRadius: BorderRadius.all(Radius.circular(20))),
        child: Row(
          children: [
            Expanded(
                child: Column(
                    crossAxisAlignment: CrossAxisAlignment.start,
                    mainAxisSize: MainAxisSize.min,
                    children: <Widget>[
                  getWeatherIcon(_weather.icon),
                  Container(
                      margin: const EdgeInsets.all(5.0),
                      child: Text(
                        "${_weather.description.capitalizeFirstOfEach}",
                        style: TextStyle(
                            fontWeight: FontWeight.normal,
                            fontSize: 16,
                            color: Colors.white),
                      )),
                  Container(
                      margin: const EdgeInsets.all(5.0),
                      child: Text(
                        "H:${_weather.high.toInt()}° L:${_weather.low.toInt()}°",
                        textAlign: TextAlign.left,
                        style: TextStyle(
                            fontWeight: FontWeight.normal,
                            fontSize: 13,
                            color: Colors.white),
                      )),
                ])),
            Column(children: <Widget>[
              Container(
                child: Text(
                  "${_weather.temp.toInt()}°",
                  textAlign: TextAlign.left,
                  style: TextStyle(
                      fontWeight: FontWeight.bold,
                      fontSize: 60,
                      color: Colors.white),
              )
              ),
              Container(
                  margin: const EdgeInsets.all(0),
                  child: Text(
                    "Feels like ${_weather.feelsLike.toInt()}°",
                    textAlign: TextAlign.left,
                    style: TextStyle(
                        fontWeight: FontWeight.normal,
                        fontSize: 13,
                        color: Colors.white),
                  )),
            ])
          ],
        ))
  ]);
}
...
Running The App
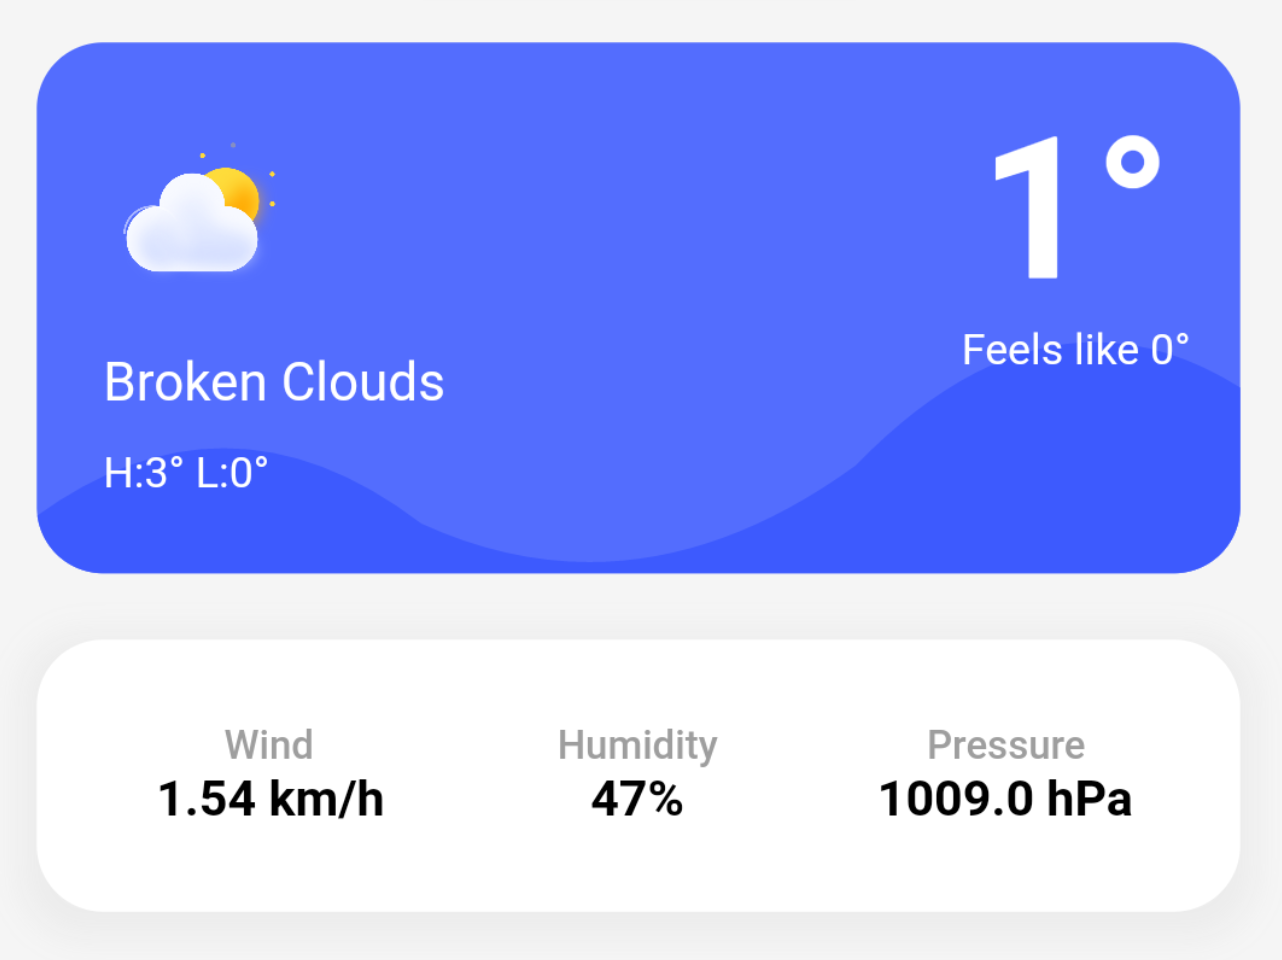
After you run your app you should see something like this! Looks pretty sweet!
Building the Second Weather Card
Next up is building this card.
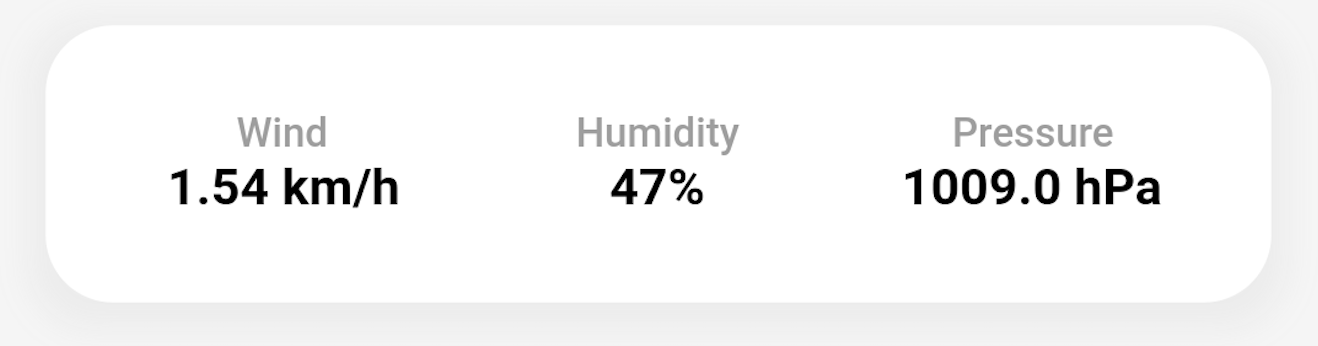
Looking at it you can see that it contains additional data from the current weather. There are 6 Text widgets for this data. Here is the widget breakdown again.
-
Red box = container
- Add padding and margin to the widgets within
-
Green box = column
- Stacks widgets vertically
-
Purple box = row
- Stacks widgets horizontally
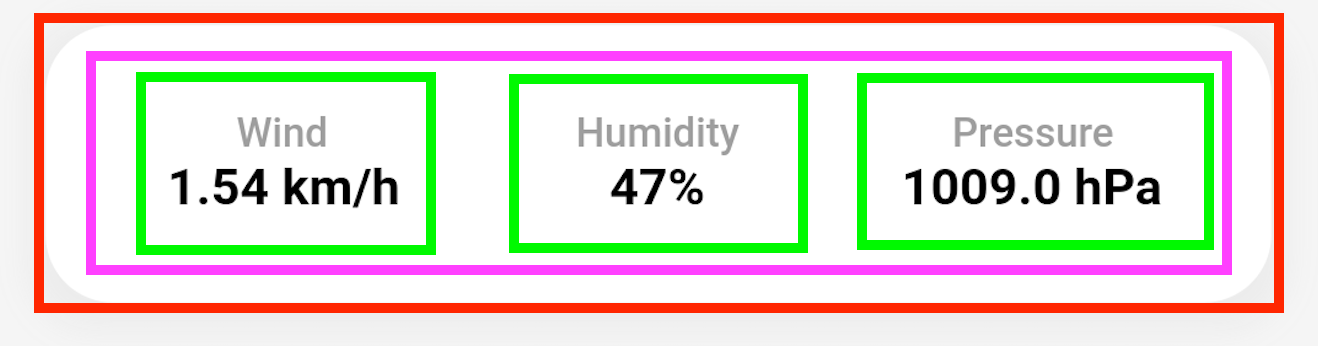
Coding the Second Weather Card
Let’s add the following method definition Widget weatherDetailsBox(Weather _weather).
Now, let’s add that first outer Container.
currentWeather.dart
...
return Container(
    padding: const EdgeInsets.only(left: 15, top: 25, bottom: 25, right: 15),
    margin: const EdgeInsets.only(left: 15, top: 5, bottom: 15, right: 15),
    decoration: BoxDecoration(
        color: Colors.white,
        borderRadius: BorderRadius.all(Radius.circular(20)),
        boxShadow: [
          BoxShadow(
            color: Colors.grey.withOpacity(0.1),
            spreadRadius: 5,
            blurRadius: 7,
            offset: Offset(0, 3),
          )
        ]),
    child:  ...
)
...
There are some properties I have added for positioning as well as rounding the corners and adding a box-shadow.
Now, let’s add a Row as the child of this container.
currentWeather.dart
...
child: Row(
          children: [
              ...
          ]
)
...
Finally, let’s add the first Column which stores the Text widgets.
currentWeather.dart
...
children: [
    Expanded(
        child: Column(
            children: [
                Container(
                    child: Text(
                "Wind",
                textAlign: TextAlign.left,
                style: TextStyle(
                    fontWeight: FontWeight.w600,
                    fontSize: 12,
                    color: Colors.grey),
                )),
                Container(
                    child: Text(
                "${_weather.wind} km/h",
                textAlign: TextAlign.left,
                style: TextStyle(
                    fontWeight: FontWeight.w700,
                    fontSize: 15,
                    color: Colors.black),
                ))
            ],
        )
    ),
    // Add other Columns here
    ...
]
...
The other two Columns have the exact same structure so feel free to add those now.
Final outcome of the weatherDetailsBox() method
currentWeather.dart
...
Widget weatherDetailsBox(Weather _weather) {
return Container(
padding: const EdgeInsets.only(left: 15, top: 25, bottom: 25, right: 15),
margin: const EdgeInsets.only(left: 15, top: 5, bottom: 15, right: 15),
decoration: BoxDecoration(
color: Colors.white,
borderRadius: BorderRadius.all(Radius.circular(20)),
boxShadow: [
BoxShadow(
color: Colors.grey.withOpacity(0.1),
spreadRadius: 5,
blurRadius: 7,
offset: Offset(0, 3),
)
]),
child: Row(
children: [
Expanded(
child: Column(
children: [
Container(
child: Text(
"Wind",
textAlign: TextAlign.left,
style: TextStyle(
fontWeight: FontWeight.w600,
fontSize: 12,
color: Colors.grey),
)),
Container(
child: Text(
"${_weather.wind} km/h",
textAlign: TextAlign.left,
style: TextStyle(
fontWeight: FontWeight.w700,
fontSize: 15,
color: Colors.black),
))
],
)
),
Expanded(
child: Column(
children: [
Container(
child: Text(
"Humidity",
textAlign: TextAlign.left,
style: TextStyle(
fontWeight: FontWeight.w600,
fontSize: 12,
color: Colors.grey),
)),
Container(
child: Text(
"${_weather.humidity.toInt()}%",
textAlign: TextAlign.left,
style: TextStyle(
fontWeight: FontWeight.w700,
fontSize: 15,
color: Colors.black),
))
],
)
),
Expanded(
child: Column(
children: [
Container(
child: Text(
"Pressure",
textAlign: TextAlign.left,
style: TextStyle(
fontWeight: FontWeight.w600,
fontSize: 12,
color: Colors.grey),
)),
Container(
child: Text(
"${_weather.pressure} hPa",
textAlign: TextAlign.left,
style: TextStyle(
fontWeight: FontWeight.w700,
fontSize: 15,
color: Colors.black),
))
],
)
)
],
),
);
}
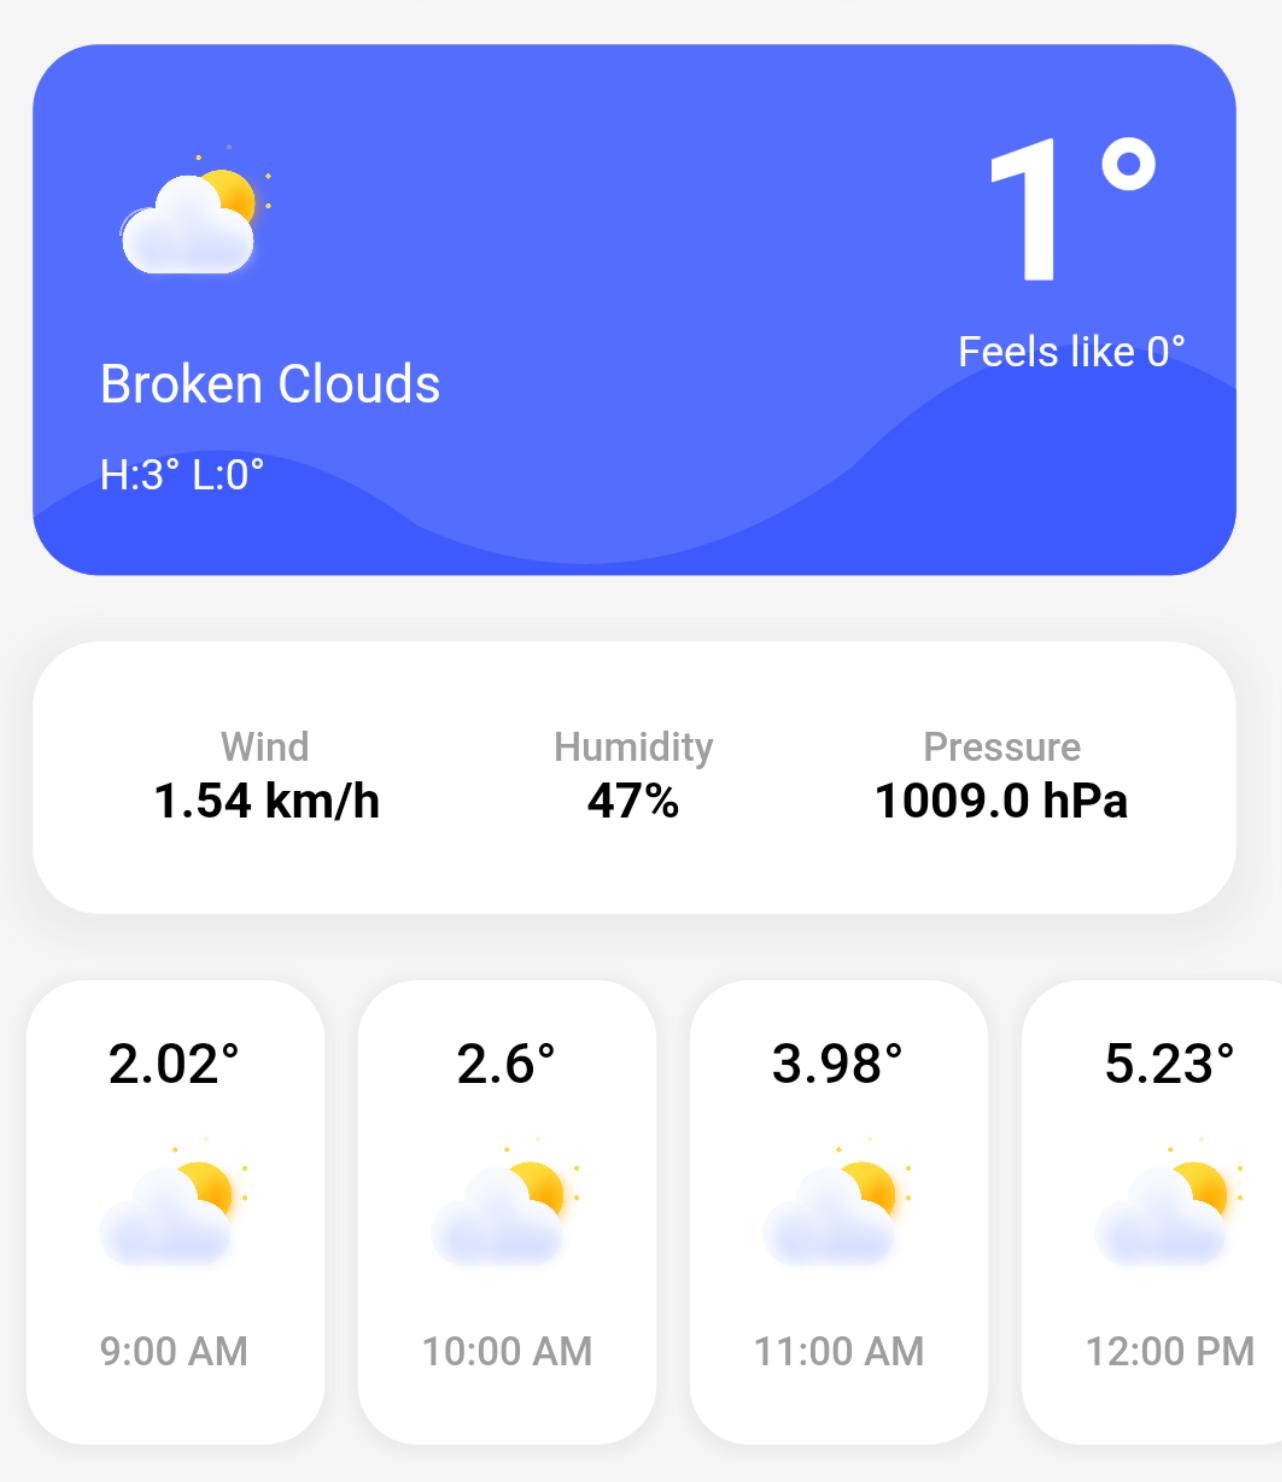
...This is what your weatherDetailsBox() method should now look like. Running the code you should see the following.
Time Stamp Conversion
Before we move onto the forecast widgets we will need to add some methods to convert timestamps into different date formats. Here are those methods.
currentWeather.dart
...
String getTimeFromTimestamp(int timestamp) {
  var date = new DateTime.fromMillisecondsSinceEpoch(timestamp * 1000);
  var formatter = new DateFormat('h:mm a');
  return formatter.format(date);
}

String getDateFromTimestamp(int timestamp) {
  var date = new DateTime.fromMillisecondsSinceEpoch(timestamp * 1000);
  var formatter = new DateFormat('E');
  return formatter.format(date);
}
...
Hourly Forecast
Now, let’s build the hourly forecast boxes.
You can see that there is a list of widgets. To build this we are going to be using a ListView widget.
-
Red box = Container
- Add padding and margin to the widgets within
-
Green box = Column
- Stacks widgets vertically
-
Blue box = ListView
- Creates a scrollable list of widgets
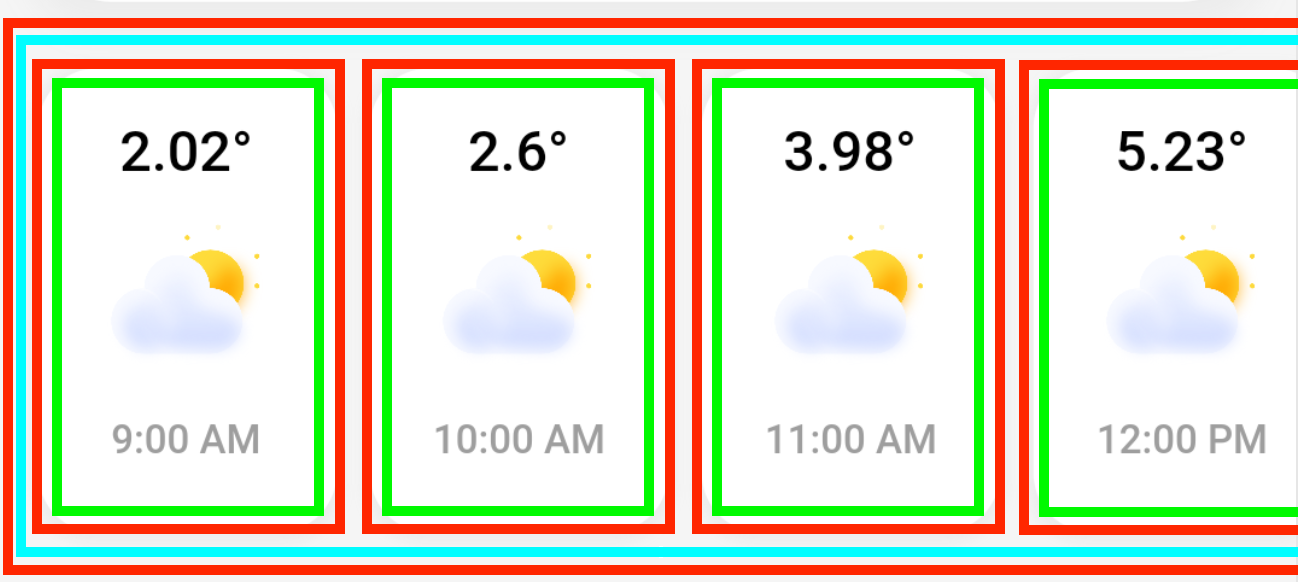
Coding the Hourly Forecast List
Let’s add the following method definition Widget hourlyBoxes(Forecast _forecast).
Now, let’s add that first outer Container.
currentWeather.dart
...
return Container(
      margin: EdgeInsets.symmetric(vertical: 0.0),
      height: 150.0,
      child:  ...
);
...
List Builder
There is a widget in Flutter called the List builder. It will allow you to pass in an array of elements and dynamically build a list of widgets based on that array. For example, we will be passing in an array of Hourly objects and for each object, we will build a Container widget.
currentWeather.dart
...
child: ListView.builder(
    padding: const EdgeInsets.only(left: 8, top: 0, bottom: 0, right: 8),
    scrollDirection: Axis.horizontal,
    itemCount: _forecast.hourly.length,
    itemBuilder: (BuildContext context, int index) {
        return Container(
            ...
        )
    }
)
...
Here you can see the ListView.builder() in action! All we need to do is fill in the Container it returns for each element.
currentWeather.dart
...
return Container(
    padding: const EdgeInsets.only(
    left: 10, top: 15, bottom: 15, right: 10),
    margin: const EdgeInsets.all(5),
    decoration: BoxDecoration(
        color: Colors.white,
        borderRadius: BorderRadius.all(Radius.circular(18)),
        boxShadow: [
            BoxShadow(
            color: Colors.grey.withOpacity(0.1),
            spreadRadius: 2,
            blurRadius: 2,
            offset: Offset(0, 1), // changes position of shadow
            )
        ]
    ),
    child: Column(
        children: [
            Text(
            "${_forecast.hourly[index].temp}°",
            style: TextStyle(
                fontWeight: FontWeight.w500,
                fontSize: 17,
                color: Colors.black),
            ),
            getWeatherIcon(_forecast.hourly[index].icon),
            Text(
            "${getTimeFromTimestamp(_forecast.hourly[index].dt)}",
            style: TextStyle(
                fontWeight: FontWeight.w600,
                fontSize: 12,
                color: Colors.grey),
            ),
        ]
    )
);
...
There we go! We should not have a list of the hourly weather! Here is the method in full.
currentWeather.dart
...
Widget hourlyBoxes(Forecast _forecast) {
return Container(
margin: EdgeInsets.symmetric(vertical: 0.0),
height: 150.0,
child: ListView.builder(
padding: const EdgeInsets.only(left: 8, top: 0, bottom: 0, right: 8),
scrollDirection: Axis.horizontal,
itemCount: _forecast.hourly.length,
itemBuilder: (BuildContext context, int index) {
return Container(
padding: const EdgeInsets.only(
left: 10, top: 15, bottom: 15, right: 10),
margin: const EdgeInsets.all(5),
decoration: BoxDecoration(
color: Colors.white,
borderRadius: BorderRadius.all(Radius.circular(18)),
boxShadow: [
BoxShadow(
color: Colors.grey.withOpacity(0.1),
spreadRadius: 2,
blurRadius: 2,
offset: Offset(0, 1), // changes position of shadow
)
]),
child: Column(children: [
Text(
"${_forecast.hourly[index].temp}°",
style: TextStyle(
fontWeight: FontWeight.w500,
fontSize: 17,
color: Colors.black),
),
getWeatherIcon(_forecast.hourly[index].icon),
Text(
"${getTimeFromTimestamp(_forecast.hourly[index].dt)}",
style: TextStyle(
fontWeight: FontWeight.w600,
fontSize: 12,
color: Colors.grey),
),
]));
}));
}
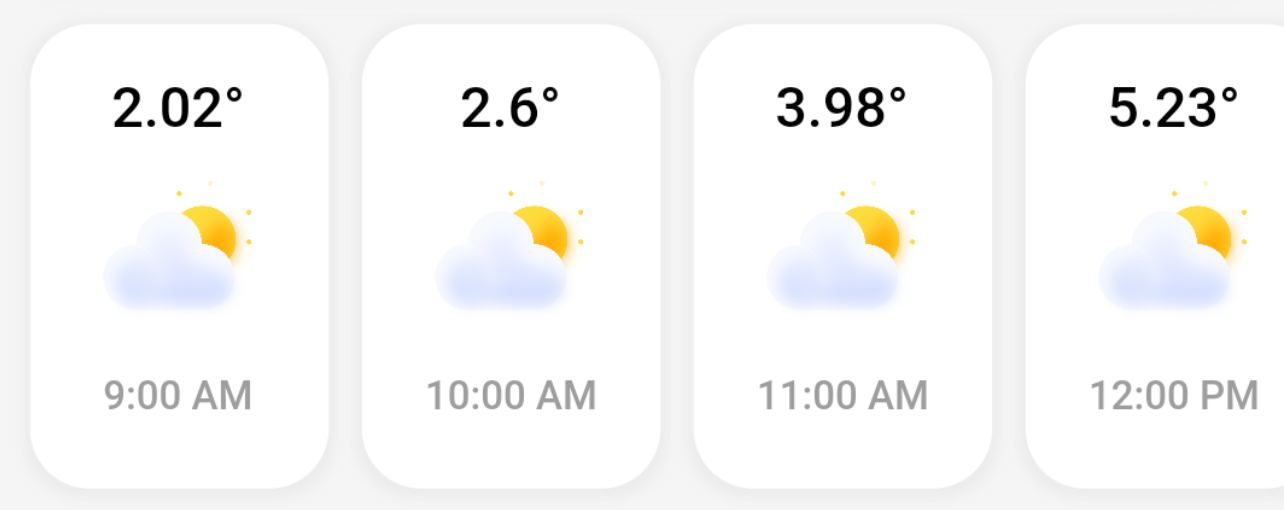
...This is what you should see now when you run the app.
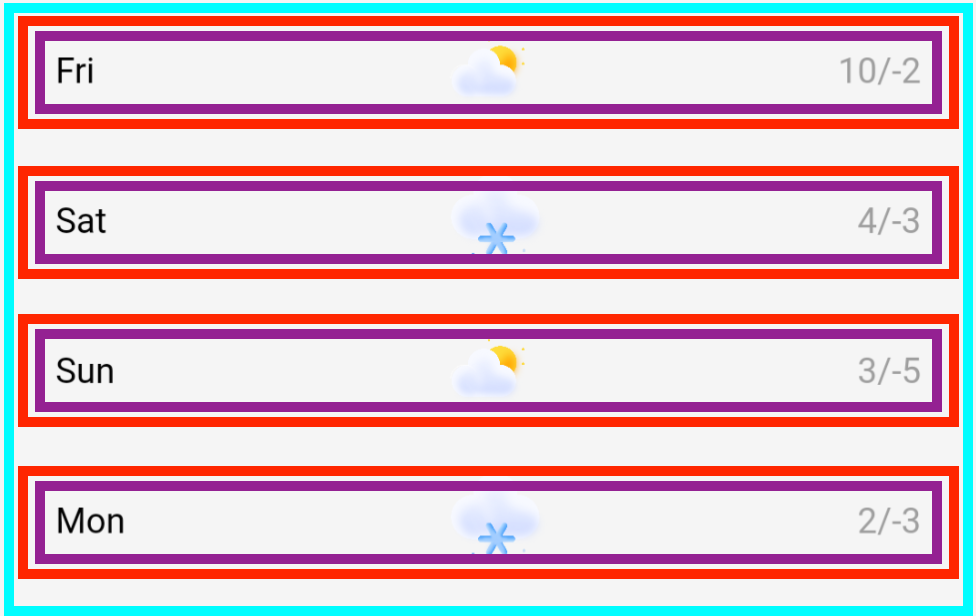
Daily Forecast
Let’s move on to the final group of widgets!
Once again let’s break it down.
-
Red box = Container
- Add padding and margin to the widgets within
-
Blue box = ListView
- Creates a scrollable list of widgets
-
Purple box = Row
- Stacks widgets horizontally
Coding the Daily Forecast List
Let’s add the following method definition Widget dailyBoxes(Forecast _forecast).
Now lets add another ListBuilder() wrapped in an Expanded()
currentWeather.dart
...
return Expanded(
    child: ListView.builder(
        shrinkWrap: true,
        physics: ClampingScrollPhysics(),
        padding: const EdgeInsets.only(left: 8, top: 0, bottom: 0, right: 8),
        itemCount: _forcast.daily.length,
        itemBuilder: (BuildContext context, int index) {
            return Container(
                ...
            )
        }
    )
);
...
Because we are inserting this ListView inside of another ListView we will need to add a few special properties in order for it to work as expected. These are shrinkWrap: true and physics: ClampingScrollPhysics().
currentWeather.dart
...
return Container(
    padding: const EdgeInsets.only(left: 10, top: 5, bottom: 5, right: 10),
    margin: const EdgeInsets.all(5),
    child: Row(
        children: [
            Expanded(
                child: Text(
                    "${getDateFromTimestamp(_forcast.daily[index].dt)}",
                    style: TextStyle(fontSize: 14, color: Colors.black),
                    )
                ),
            Expanded(
                child: getWeatherIconSmall(_forcast.daily[index].icon)),
            Expanded(
                child: Text("${_forcast.daily[index].high.toInt()}/${_forcast.daily[index].low.toInt()}",
                textAlign: TextAlign.right,
                style: TextStyle(fontSize: 14, color: Colors.grey),
                )
            ),
        ]
    )
);
...
Go ahead and add these last additions to the Container widget. This is what the method should look like when it’s complete.
currentWeather.dart
...
Widget dailyBoxes(Forecast _forcast) {
  return Expanded(
      child: ListView.builder(
            shrinkWrap: true,
            physics: ClampingScrollPhysics(),
            padding: const EdgeInsets.only(left: 8, top: 0, bottom: 0, right: 8),
            itemCount: _forcast.daily.length,
            itemBuilder: (BuildContext context, int index) {
                return Container(
                    padding: const EdgeInsets.only(left: 10, top: 5, bottom: 5, right: 10),
                    margin: const EdgeInsets.all(5),
                    child: Row(
                        children: [
                            Expanded(
                                child: Text(
                                    "${getDateFromTimestamp(_forcast.daily[index].dt)}",
                                    style: TextStyle(fontSize: 14, color: Colors.black),
                                    )
                                ),
                            Expanded(
                                child: getWeatherIconSmall(_forcast.daily[index].icon)),
                            Expanded(
                                child: Text("${_forcast.daily[index].high.toInt()}/${_forcast.daily[index].low.toInt()}",
                                textAlign: TextAlign.right,
                                style: TextStyle(fontSize: 14, color: Colors.grey),
                                )
                            ),
                        ]
                    )
                )
            }
        )
    );
}
...
This is what you should see now when you run the app.
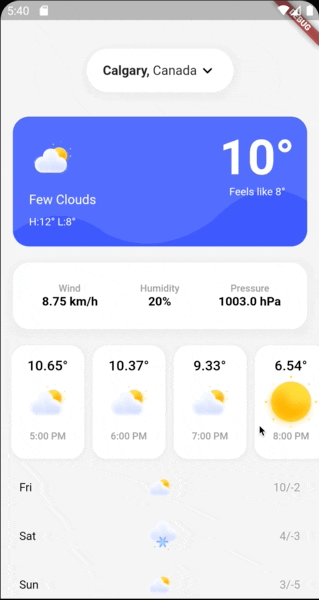
App Bar
Last but not least we need to create a title at the top of the screen to display the current location. For a future addition to the app, we could make this title a button that could display a dropdown to select a different location.

Let’s take a look at how this was built.
-
Red box = Container
- Add padding and margin to the widgets within
-
Purple box = Row
- Stacks widgets horizontally
Coding the app bar
Add the following method definition Widget createAppBar(List<Location> locations, Location location, BuildContext context).
Let’s insert that Container into the method
currentWeather.dart
...
return Container(
    padding: const EdgeInsets.only(left: 20, top: 15, bottom: 15, right: 20),
    margin: const EdgeInsets.only(top: 35, left: 15.0, bottom: 15.0, right: 15.0),
    decoration: BoxDecoration(
      color: Colors.white,
      borderRadius: BorderRadius.all(Radius.circular(60)),
      boxShadow: [
        BoxShadow(
          color: Colors.grey.withOpacity(0.1),
          spreadRadius: 5,
          blurRadius: 7,
          offset: Offset(0, 3),
        )
      ]
    ),
    child: ...
)
...
On this Container, we have some padding, margin, and BoxDecoration.
Let’s add the Row inside the Container
currentWeather.dart
...
child: Row(
    mainAxisSize: MainAxisSize.min,
    children: [
        Text.rich(
            TextSpan(
                children: <TextSpan>[
                    TextSpan(
                        text: '${location.city.capitalizeFirstOfEach}, ',
                        style:
                            TextStyle(fontWeight: FontWeight.bold, fontSize: 16)),
                    TextSpan(
                        text: '${location.country.capitalizeFirstOfEach}',
                        style: TextStyle(
                            fontWeight: FontWeight.normal, fontSize: 16)),
                ],
            ),
        ),
        Icon(
            Icons.keyboard_arrow_down_rounded,
            color: Colors.black,
            size: 24.0,
            semanticLabel: 'Tap to change location',
        ),
    ],
)
...
Inside this Row, we use the TextSpan widget to display text with multiple styles. We also use the Icon widget to display a downward arrow icon.
Here is the method in full.
currentWeather.dart
...
Widget createAppBar(List<Location> locations, Location location, BuildContext context) {
  return Container(
    padding: const EdgeInsets.only(left: 20, top: 15, bottom: 15, right: 20),
    margin: const EdgeInsets.only(top: 35, left: 15.0, bottom: 15.0, right: 15.0),
    decoration: BoxDecoration(
      color: Colors.white,
      borderRadius: BorderRadius.all(Radius.circular(60)),
      boxShadow: [
        BoxShadow(
          color: Colors.grey.withOpacity(0.1),
          spreadRadius: 5,
          blurRadius: 7,
          offset: Offset(0, 3),
        )
      ]
    ),
    child: Row(
      mainAxisSize: MainAxisSize.min,
      children: [
        Text.rich(
          TextSpan(
            children: <TextSpan>[
              TextSpan(
                  text: '${location.city.capitalizeFirstOfEach}, ',
                  style:
                      TextStyle(fontWeight: FontWeight.bold, fontSize: 16)),
              TextSpan(
                  text: '${location.country.capitalizeFirstOfEach}',
                  style: TextStyle(
                      fontWeight: FontWeight.normal, fontSize: 16)),
            ],
          ),
        ),
        Icon(
          Icons.keyboard_arrow_down_rounded,
          color: Colors.black,
          size: 24.0,
          semanticLabel: 'Tap to change location',
        ),
      ],
    )
  );
}
...
Finishing Touches
Congratulations! You have now built an amazing-looking app with Flutter! If you are feeling adventurous try to add in the ability to change your location from a list you define in main.dart.
Feel free the check out the full project over on GitHub.